How to tie the Figure-eight follow-through
The figure-eight follow-through makes a fixed loop by retracing a loose figure-eight with the rope end. Because the end goes through the attachment first, it can connect directly to a closed ring or harness.
- Type
- Loop knots
- Difficulty
- Moderate
- ABOK number
- #1047
- Also known as
- Retraced figure-eight, Figure-eight retrace, Flemish loop
- Best for
- Climbing, Rescue
The finished knot has two strands following the same figure-eight path. This makes it straightforward to trace and inspect. The example uses a practice ring; a harness requires its specified tie-in points.[1][3]
A figure-eight on a bight produces the same kind of loop without rethreading, but cannot be threaded directly through a closed attachment.[1]
Step-by-step: tying the Figure-eight follow-through
-
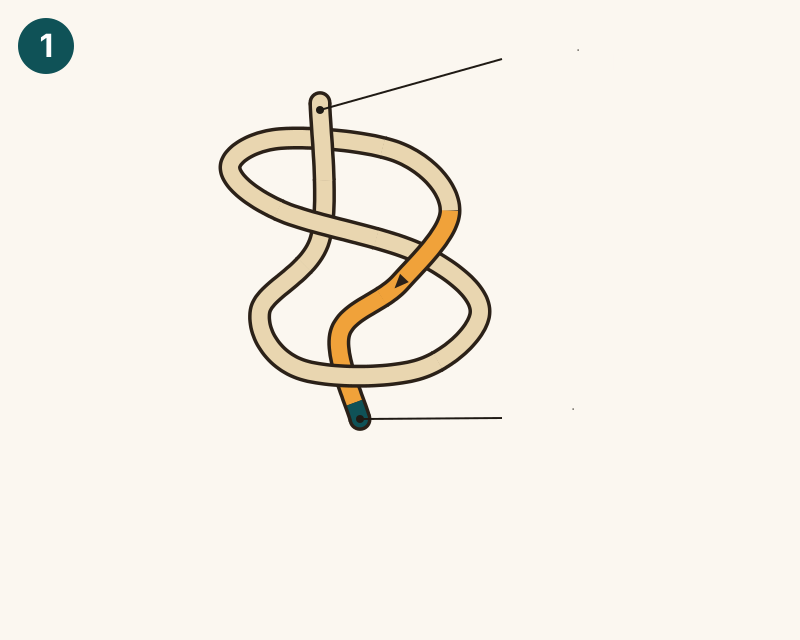
Step 1: Tie a loose figure-eight
Leave a long working end. Make a loop, take the end around behind the standing part, then tuck it through the loop. Keep this single figure-eight loose enough to retrace.
-
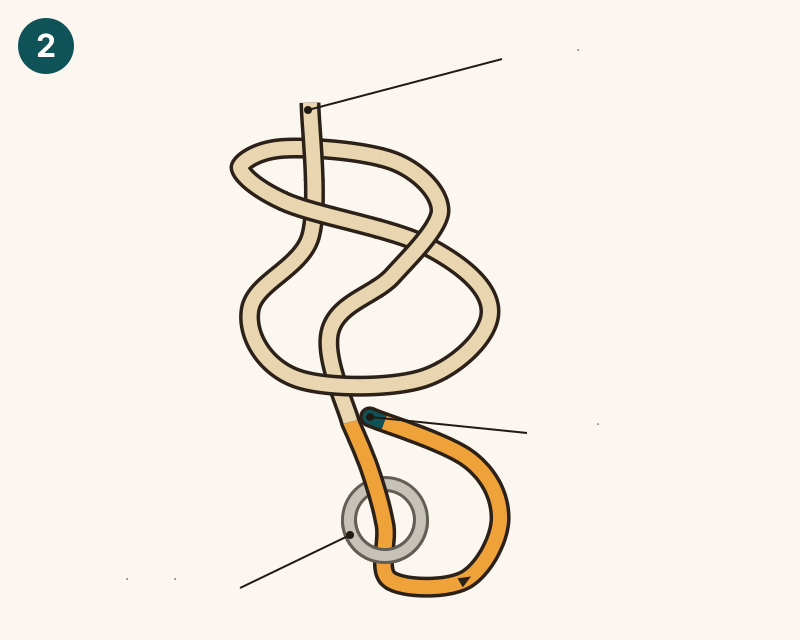
Step 2: Thread the attachment
Pass the end through the practice ring and bring it back toward the knot. This sets the size of the attachment loop. For a climbing harness, use the tie-in points specified by its manufacturer.
-
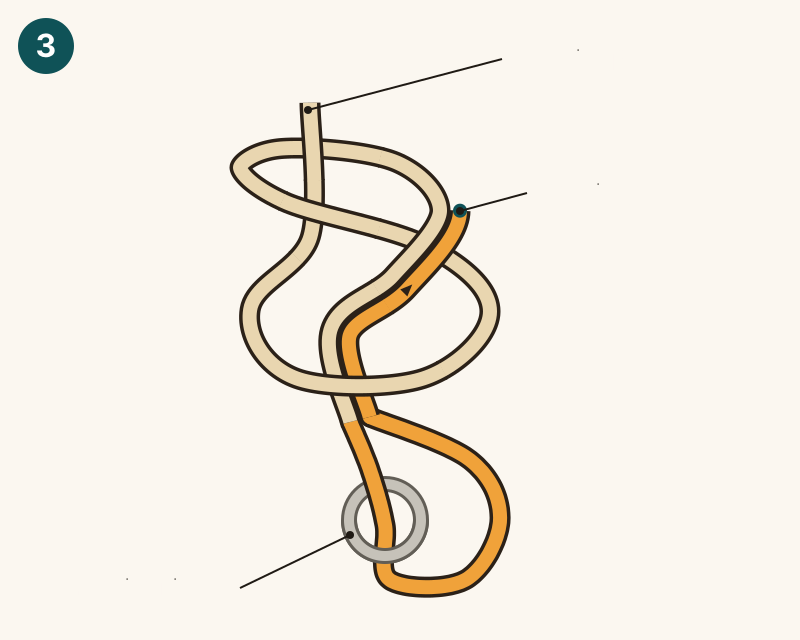
Step 3: Retrace the lower half
Feed the end back into the knot beside the strand that leads to the ring. Follow that strand backward, keeping the new rope beside it through each turn and crossing.
-
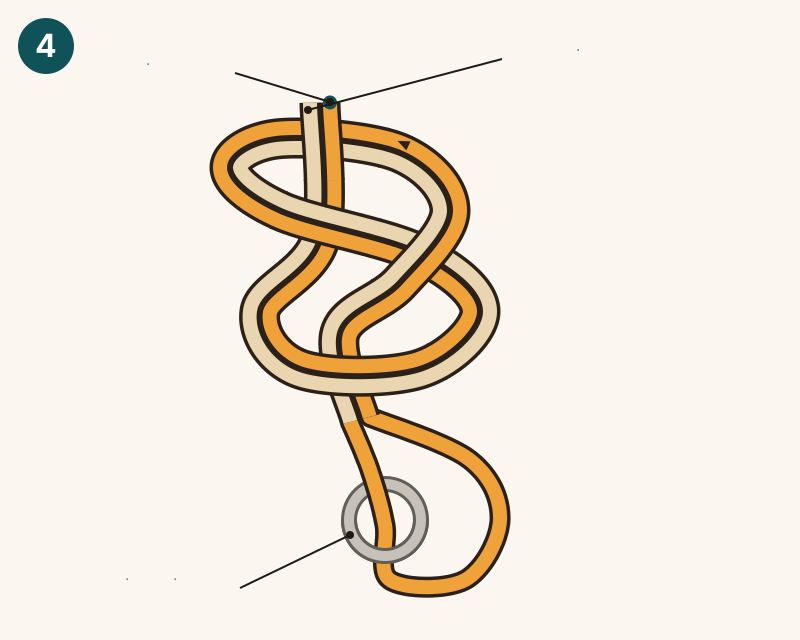
Step 4: Finish the retrace
Continue beside the original strand all the way around the upper turn. The working end must emerge beside the standing part. Every section of the figure-eight should now have a partner.
-
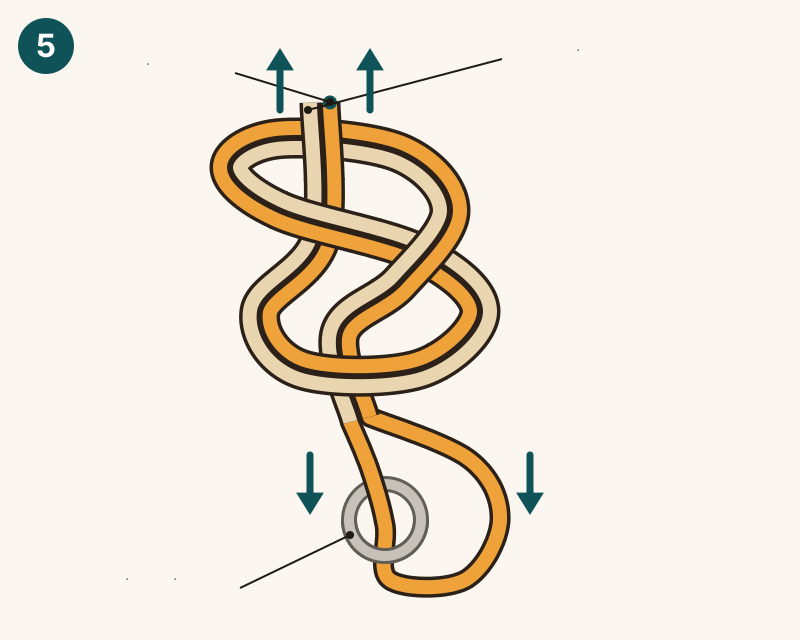
Step 5: Dress, set and check
Remove twists and slack, then tighten each of the four strands leaving the knot. Check the paired path, secure attachment and adequate tail. The diagram stays spread out to make the retrace visible; snug the real knot firmly before use.
What the Figure-eight follow-through is used for
Strengths and weaknesses
Tips and common mistakes
Tips
- Follow the existing rope rather than memorizing a separate return route.
- Pull all four strands individually to remove hidden slack.[4]
Common mistakes
- Missing part of the retrace. Check the whole knot, not only its outline.
- Crossed pairs or loose turns. Dress and set before loading.
- Threading the wrong harness point. Check against the manufacturer’s instructions.[3]
Variations
- Figure-eight on a bight — Forms the loop with doubled rope instead of a retraced end.[2]
Related knots
- Figure-eight knot — The single-strand starting knot.
- Bowline — Another fixed loop, with different security and backup requirements.
- Double fisherman’s knot — Joins cord ends rather than forming a tie-in loop.
Frequently asked questions
Why use the follow-through method?
It lets the rope end pass through a closed attachment before the loop is completed.[1]
Where should the tail finish?
Beside the standing part after following the whole original knot in reverse.[1]
How do I check it?
Trace both strands throughout the figure-eight, then check the attachment, tail and tightening. For climbing, include a partner check.[1][3]
Can it jam?
Yes. A loaded figure-eight loop can be difficult to untie.[2]
Sources
- Figure 8 Follow Through Loop — Animated Knots by Grog — rethreading, inspection, ABOK #1047 and backup placement
- Figure-eight loop — Wikipedia — loop forms and tendency to jam
- ACCESSBOOK: Belaying in a Climbing Gym — Petzl — harness tie-in sequence and partner checks
- Figure Eight — NetKnots — distinction between the single stopper and retraced loop
Last reviewed: